December 20, 2013

Baked Orzo with Eggplant and Tomatoes


If your holidays are anything like mine, then the next week or two will be a study in decadence. There will be rich, roasted meats, hearty sides, and of course, lots and lots of cookies. Christmas only comes once a year, and I don't intend to shy away from its culinary celebrations.

But that means eating sensibly in the weeks before and after the holidays. With snow on the ground and temperatures already plummeting into the 20s, though, it's just too cold to pick at a bowl of lettuce.

What's a girl to do? One solution is to go heavy on the veggies. Mixed with just enough pasta and cheese to satisfy the entire family. 

This dish features eggplant, cooked until silky and tender. And tomatoes, warm and bursting with juice. It's a great way to feel virtuous while treating your tastebuds.


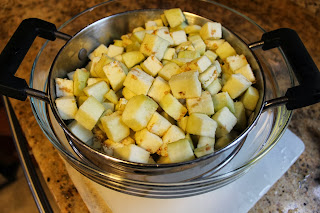
Peel and chop the eggplant. Sprinkle with salt and let it drain over a colander for 30 minutes.


Rinse well and pat dry.


Saute eggplant in olive oil until golden brown (dark in some spots). Remove will a slotted spoon and set aside.


Cook carrots and celery in the same pan.


Add onion and garlic and cook until everything is golden and tender.


Turn off the heat and add back the cooked eggplant.


Then add the orzo and tomato paste. Cook for 2 minutes.


Add tomatoes, thyme, lemon zest, salt, black pepper and stock to the pan.


Finally, add the cheeses and give it a good stir.


Transfer to an oven-safe baking dish.


Bake until pasta is cooked and liquid is absorbed.


Baked Orzo with Eggplant and Tomatoes

Adapted from a recipe by Yotom Ottolenghi

1 large eggplant, peeled and cut into 3/4-inch dice
1/4 cup olive oil
1 medium carrot, peeled and cut into 1/4-inch dice
1 celery stalk, in a 1/4-inch dice
1 medium onion, finely diced
3 garlic cloves, minced
8 ounces orzo, rinsed
1 tsp tomato paste
1 1/2 cups vegetable stock
1 Tbsp fresh thyme
1 tsp grated lemon zest
3 medium tomatoes, diced
4 ounces firm mozzarella, cut into 1/3-inch dice
1/2 cup Parmesan cheese, grated
Salt and black pepper


1.    Sprinkle eggplant generously with salt and let it drain in a colander for 30 minutes. After 30 minutes, rinse it well and pat it dry.

2.    Preheat oven to 350°F.

3.    Heat a large frying pan over medium-high heat. Once hot, add the oil. Once the oil is shimmering, add the eggplant. Fry for 8 minutes, stirring pieces occasionally, until golden brown and dark in some spots. Remove with a slotted spoon.

4.    Add celery and carrots to frying pan and cook for 3 minutes. Then add onion and garlic. Cook together for 5 more minutes on medium heat.

5.    Stir in the orzo and tomato paste and cook for two minutes more.

6.    Off the heat, add the thyme, tomatoes, fried eggplant, lemon zest, salt, black pepper and vegetable stock. Finally, add the cheeses. Mix well.

7.    Transfer mixture to 1 2-quart ovenproof baking dish. Cover with foil and bake 20 minutes, then bake 20 minutes without the foil. (You may need to bake it a bit longer until the pasta is cooked and all of the liquid is absorbed.)

8.    Let rest for 5 minutes before serving.


Serves 4


December 3, 2013

Cod Cakes


Psst. Over here. Come closer. A little closer. Okay. I have to tell you a secret. I don't like leftover turkey. At all. In any form. Not sliced in a sandwich. Or shredded into soup. Not cubed into a pot pie. Or minced into a meatloaf.

But leftover mashed potatoes? Now that's another story altogether. A nice big scoop served with a ladleful of gravy? Yes, please.


But since that's not the *healthiest* option, I often transform leftover mashed potatoes into cod cakes. The potatoes give these cod cakes a delicate, melt-in-you-mouth texture. They're light and creamy on the inside, golden brown and crispy on the outside.


Of course you don't need leftover Thanksgiving mashed potatoes to make these cod cakes. But if you've got some, I highly recommend giving this recipe a try.


Place mashed potatoes in a bowl. Reheat to lukewarm if cold.


Saute onion, bell pepper and celery until tender. 


When cooled, combine the vegetables and potatoes.


Add lemon zest and egg. Set aside.


Season fish with salt and pepper.


Saute over medium-high heat until fish is cooked through, about 2 to 4 minutes per side. Place in a bowl and flake into large chunks. 


When fish has cooled, gently mix into potato mixture. Add just enough breadcrumbs so that the mixture is no longer loose. 


Form into burger sized patties. Refrigerate for at least 30 minutes.


Place cod cakes into a hot skillet. Cook for 4 minutes per side, over medium to medium high heat, until the cod cakes are dark golden brown.


Serve warm.


Cod Cakes

Recipe by TheGarlic Press

1 medium onion, finely chopped
1 red bell pepper, finely chopped
2 small celery, finely chopped
salt
pepper
1/2 tsp Old Bay or cajun seasoning (optional)
3 cups (or so) leftover mashed potatoes (gently reheated to lukewarm if cold)
Zest from 1 lemon
1 pound cod fillets
1 egg
1/3 cup breadcrumbs (or more, as needed)
olive or canola oil

 1.    Saute onion, bell pepper and celery in olive oil until tender. Season with salt, pepper and Old Bay or cajun seasoning (if using). Once cooled, combine vegetables with mashed potatoes. Season mixture with additional salt and pepper, if needed.

2.    Add  lemon zest and egg to potato mixture and stir to combine. 

3.    Season cod with salt and pepper. Cook on skilled over medium-high heat for 2 to 4 minutes per side, until cooked through. Cool slightly and break into large chunks.

4.   Gently combine fish with potato/vegetable mixture. Add breadcrumbs. Mixture should just hold together. Add more breadcrumbs if needed.

5.    Form mixture into burger-sized patties. Place on baking dish and refrigerate for at least 30 minutes.

6.    Pour enough canola or olive oil in a large skillet to cover the bottom of the pan. Heat over medium heat. When hot, add the cod cakes (don't crowd the skillet; work in batches if you need to).

7.    Cook cod cakes until brown and crisp, about 4 minutes per side.

8.    Serve warm with lemon slices and remoulade or tartar sauce.
  

Makes: 6 cod cakes


November 22, 2013

Slow Cooker Chicken Stock


I'm going to guess what you're thinking. "It's the week before Thanksgiving. Why on earth is she posting a recipe for chicken stock? Why not turkey, stuffing, sweet potatoes. Or even gravy, for the love of God?!"

I'll tell you why. Because chicken stock is going to be the backbone of nearly everything on your Thanksgiving table. It's going to moisten the bread in your stuffing. It'll be the foundation of your soup. And you'll reduce it down and add turkey drippings to it to make your gravy. Even my green bean recipe uses a cup of chicken stock.

To put it simply:

delicious chicken stock = delicious Thanksgiving spread

The recipe is here a bare bones, basic chicken stock. It's made with chicken wings (great bone/meat ratio), water, onion, garlic and salt. The flavor is pure chicken. It's a wonderful base for chicken noodle soup, gravy, or any other recipe in which you want the chicken flavor to really shine through.

You can modify this recipe to suit your needs. If you want a more intensely flavored stock, roast or saute the bones first. Or transfer the stock to a saucepan and reduce it down until it's strong enough. (A word of caution: if you think you might reduce the stock, be conservative when adding salt. As the stock reduces down, it will get more and more salty.)

There's also plenty of room to personalize. If you like a more complex stock, add celery, onion, peppercorns and/or a bay leaf. If the stock is destined for matzoh ball soup, throw in some dill. If you're going to use it for an Asian soup or curry, consider adding fresh ginger or star anise.

The recipe is as spare the list of ingredients. Put all the ingredients in a slow cooker and turn it on. Ten hours later, strain it. That's it. You're done. This recipe is perfect for the days before Thanksgiving when you're already running around like a chicken with it's head cut off (sorry -- couldn't resist)!

Oh, and in case you're wondering, we haven't finalized this year's Thanksgiving menu yet. But here's what we're thinking, a mix of old favorites and new recipes we're dying to try:

Sweet Potatoes TBD
Mashed Potatoes TBD


Place the chicken wings in your slow cooker.


Add onions, garlic and salt.


Add water and turn the machine on. I cooked the stock on low for 10 hours. And had to be very patient. After 5 hours, it didn't look all that different than it did at hour 1. I started to doubt. 


I shouldn't have. Because at hour 8, it suddenly started to look like this.


And by hour 10, it looked and smelled divine. Okay, I lied. It didn't look divine yet. But it did smell divine.


 Strain out the wings, onions, and "bits."


And you'll have this.


And if you're lucky, a bowl of this.


Slow Cooker Chicken Stock

Recipe from Cook's Illustrated

3 pounds uncooked chicken wings
2 1/2 quarts water
1 large onion, chopped
3 garlic cloves, smashed
2 tsp salt, or more to taste

1.    Place all ingredients in a slow-cooker. Cook on LOW for 10 hours or HIGH for 5 hours.

2.    Strain out chicken parts, onion and garlic. (I strained it twice. The first time, I used a "spider" to remove the chicken pieces and onion. The second time I poured the stock through a sieve lined with a paper towel to catch the little bits that I don't want floating around in my stock).

3.    Use right away, or freeze.

Yield: about 3 quarts

Notes: This stock is not very fatty. But if you'd like, you can refrigerate the stock for a few hours. The fat will congeal, and you can remove it. Also, you can portion the stock out into 1 quart zip loc bags, freeze them flat in your freezer, and use as needed.


November 5, 2013

Chicken Piccata Pasta


I love the flavors of chicken piccata. As far as I'm concerned, the chicken is an afterthought. It's the sauce I'm after. Rich with garlic and shallots, bright with lemon juice and capers.

capers
Capers are the edible flower buds of the caper bush. When you bite into a caper, it releases a little burst of salty, pickle-flavored juice. The flavor of capers is the defining flavor of chicken piccata.

In addition to piccata dishes, you'll find capers in pasta puttanesca, remoulades and vinaigrettes. You might recognize them as the dark green, pea-size spheres you see next to the lox and cream cheese on a bagel spread. 

Traditionally, chicken piccata is served as a breaded cutlet topped with its defining lemon-caper sauce, and served on a bed of pasta.

This variation takes the essential components and turns them into a one-pot meal. It's lighter because rather than dipping the chicken in an egg wash and breadcrumbs, it's just lightly dusted with a bit of flour. I used mini penne, my son's current favorite pasta shape. But use any short pasta you like.


Gather your ingredients.


Set pasta to boil.


Season chicken with salt and pepper. Toss lightly with flour.


Lightly brown chicken in hot butter/oil mixture. Remove chicken and set aside.


Add shallots (I used sliced red onion, but will use chopped shallots next time), garlic and thyme to the same pan. Cook until shallots are tender.


 Add flour, stir to coat shallot mixture, and cook for a minute or two until the flour is golden brown.


Whisk in lemon juice and chicken stock. Let simmer for a couple of minutes until the sauce thickens slightly.


Add the capers...


Chicken...


And pasta. 


Serve warm.


Chicken Piccata Pasta

Minimally adapted from A Spicy Perspective

1 lb chicken thighs, cut into bite size pieces (you can also use breasts or tenders)
1 lb pasta
4 Tbsp flour, divided
2 Tbsp butter
3 Tbsp olive oil
2 cloves garlic, minced
1 shallot, finely chopped
2 tsp fresh thyme leaves
1/3 cup fresh lemon juice
3/4 cup chicken stock
3 ounces capers, drained
Salt
Pepper


1.    Place a large pot of salted water over high heat and bring to a boil.

2.    Meanwhile, salt and pepper the chicken liberally and toss with 2 tablespoons of the flour.

3.    Place a large skillet over medium heat. Add butter and oil.

4.    Drop the pasta in the boiling water and cook as instructed on the package then drain.

5.    Once the butter is melted, place the chicken pieces in butter/oil mixture and saute for 2-3 minutes per side until golden brown and just cooked through. Remove the chicken with a slotted spoon and place on paper towels to dry.

6.    Add the garlic, shallots and thyme to the same pan and saute for few minutes, until the shallots are tender. Whisk in the remaining 2 tablespoons flour until it turns a light golden brown. sauce.

7.    Then whisk in the lemon juice and chicken stock.

8.    Once the sauce is simmering again, toss in the capers and chicken. Mix in the pasta and serve warm.


Serves 6.


October 9, 2013

Smooth and Creamy Hummus


I thought I'd continue with the theme of healthier Game Day snacks. In my last post, I talked about buffalo cauliflower bites, a lighter and healthier version of that Game Day stalwart, buffalo wings.

Another quintessential Game Day (or any day) snack is chips and dip. When I was little, that meant Lays potato chips with sour cream and onion dip. Tortilla chips with guacamole came later. These days, it's pita chips and hummus. 

Truth be told, I usually buy my hummus. I'm partial to Trader Joe's edamame hummus, with its distinctive green color and garlicky bite. I've made hummus a few times and it's been fine. But somehow, when I've made it, it's always had a grainy texture that turned me off.

I might not have even tried this hummus recipe if it hadn't been billed as "smooth and creamy." The secret is cooking the chickpeas with a little baking soda. The baking soda works on the skins so that they come right off the chickpeas. They float to the top of the cooking water from where you can easily skim them off. No skins, no grainy hummus.

The flavor didn't blow me away at first. But that was easily fixed. A drizzle of good olive oil, a sprinkling of pine nuts, a dusting of smoked paprika and I was in business. Next time I'll cut back a little on the tahini and throw in some extra garlic and lemon juice.

You can really play around with this recipe. Add a chipotle pepper, toss in some fresh herbs, or add chopped olives or roasted peppers. In other words, take this basic recipe and make it your own.


Soak dried chickpeas overnight in cold water.


Drain. Then heat for a few minutes with baking soda, until the skins start to peel off.


Cover with water and bring to a boil.


Cook until tender, skimming off any foam and skins that rise to the top.


Drain, then place cooked chickpeas in a food processor.


Process until you get a stiff paste.


With the processor running, add the following through the feed tube: tahini paste, lemon juice, garlic, salt and ice water. Let the processor run for five minutes, until you get a gloriously smooth and creamy hummus.


Enjoy!


Smooth and Creamy Hummus

Recipe slightly adapted from Jerusalem by Yotam Ottolenghi an d Sami Tamimi

*I cut down a little on the tahini and amped up the lemon juice and garlic.

1 1/4 cups dried chickpeas
1 tsp baking soda
6 1/2 cups water
3/4 cup tahini (light roast)
6 Tbsp freshly squeezed lemon juice
6 cloves garlic, crushed
6 1/2 Tbsp ice cold water
Salt
Good quality olive oil, pine nuts and paprika, to serve (optional)

1.    The night before, put the chickpeas in a large bowl and cover them with cold water at least twice their volume. Leave to soak overnight.

2.    The next day, drain the chickpeas. Place a medium saucepan over high heat and add the drained chickpeas and baking soda. Cook for about three minutes, stirring constantly.

3.    Add the water and bring to a boil. Cook, skimming off any foam and any skins that float to the surface. The chickpeas will need to cook for 20 to 40 minutes, depending on the type and freshness, sometimes even longer. Once done, they should be very tender, breaking up easily when pressed between your thumb and finger, almost but not quite mushy.

4.    Drain the chickpeas. Place the chickpeas in a food processor and process until you get a stiff paste.

5.    Then, with the machine sill running, add the tahini paste, lemon juice, garlic, and 1 1/2 teaspoons salt. Finally, slowly drizzle in the ice water and allow it to mix for about five minutes, until you get a very smooth and creamy paste.

6.    Transfer the hummus to a bowl, cover the surface with plastic wrap, and let it rest for at least 30 minutes. If not using straightaway, refrigerate until needed. Make sure to take it out of the fridge at least 30 minutes before serving.

7.    Serve with a drizzle of good quality olive oil, a dusting of paprika and a sprinkling of pine nuts.


Serves 6

Note: This hummus will keep in the refrigerator for up to three days.