March 30, 2012

Kimchi Fried Rice


Lately there have been more and more days when I look at the clock and realize I've got less than 30 minutes to get dinner on the table. There's a lot you can do in 30 minutes if you've planned things out ahead of time. But it's harder if you haven't.

This is a dish that doesn't require much planning. And it's a good way to use up leftover rice. I tend to have  leftover rice in my fridge pretty often because I'm terrible at estimating how much we're going to eat at any given meal.

Kimchi
In addition to the rice, all you need are some eggs and a jar of kimchi.

Kimchi is a Korean condiment of pickled vegetables. It’s usually made with cabbage, but you’ll find kimchi made with radish, cucumbers, or other vegetables. The basic formula is the main vegetable along with garlic, salt, vinegar and chili peppers.

Kimchi is high in fiber, has lots of vitamins, and like yogurt (another fermented food), is full of healthy bacteria.

You can make kimchi yourself, but you can also buy it. It’ll almost definitely be in your Asian grocery store (probably the refrigerated section). I’ve even found it at Stop and Shop. And even though it looks fiery hot, it isn’t always. The jar I bought at the grocery store was pretty mild.

If you’ve ever eaten at a Korean restaurant, you’ve undoubtedly had a dish of kimchi placed on your table. It’s a ubiquitous condiment in Korea, something that’s eaten with everything.

In this recipe, the kimchi gives the rice both flavor and texture. Even after you sauté it, the tender cabbage holds on to a little crunch.

The fried rice is delicious and substantial on its own. But I think it’s even better topped with a fried egg. I love piercing the yolk and watching it run down in a thick, golden river, flavoring the rice underneath it.

Just imagine a bite of flavorful rice and tangy kimchi, laced with puddles of rich egg yolk and bits of salty, crispy egg white.

You’ll quickly become a kimchi convert, like me.


Chop up the kimchi into small pieces.


Saute kimchi in hot oil until all the liquid evaporates and the kimchi starts to brown in spots.


Add the rice. Cook until the rice and kimchi are thoroughly mixed and the rice is hot.


In the meantime, fry up your eggs. Season with salt and pepper. Leave the yolks a little runny so you can mix them up into the rice later.


When the rice is hot, stir in the butter and sesame oil.


To serve, put some rice in a bowl. Top with a fried egg and garnish with scallions and sesame seeds. Pierce the egg yolk with your fork and inhale deeply as the yolk starts to run into the rice. Enjoy!


Kimchi Fried Rice

Adapted from a recipe by Orangette

Use leftover cooked rice for this recipe.

1 Tbsp canola oil
2 cups Napa cabbage kimchi, diced
4 cups leftover, cooked rice
1 Tbsp unsalted butter, plus more for frying eggs
2 tsp sesame oil
Salt
Sesame seeds, for garnish
Sliced scallions
Eggs

1.    Heat the oil in a pan over medium heat. Add the kimchi, and cook for several minutes, until the liquid evaporates and the kimchee begins to brown in spots.

2.    When the kimchi looks right, raise the heat to high, and add the rice, stirring well. Cook, stirring occasionally, for several minutes, until the rice is hot and beginning to brown.

3.    Meanwhile, in another skillet, fry as many eggs as you’d like. Season with salt and pepper to taste.

4.    When the rice is ready, stir in the butter and sesame oil, and season with salt to taste.

5.    Divide between two or three bowls, and top each with a fried egg or two. Garnish with sesame seeds and scallions.


Serves 2 to 3


March 26, 2012

Carrot Ginger Soup


Lately I've been trying to get more vegetables into my son's meals.

It’s not what you think. He doesn't dislike vegetables. He doesn't refuse to eat them.

He’s a skinny kid and a slow eater. So I usually encourage him to eat the most calorie-dense things on his plate. Unfortunately, that means the veggies often go by the wayside.

But then I came up with an idea that’s been working great. At the beginning of the week I make a big batch of a pureed vegetable soup. My son gets his with a big splash of heavy cream (he needs the calories); my husband and I eat it as is (we most definitely do not need the extra calories!).

To keep my son interested, I’ve been letting him choose what kind of soup he wants to eat. This week he chose carrot. I grimaced a little on the inside because I’m not a huge fan of cooked carrots. But if he wanted carrot soup, that’s what he was going to get.

I decided on a recipe for carrot-ginger soup. I figured that we like the carrot-ginger dressing at our favorite sushi place, so the flavor combo would probably work in a soup. And boy does it ever!

Carrots and ginger complement each other beautifully. Cooking enhances the sweetness of the carrots and mellows the sharpness of the ginger. The result is a naturally sweet and subtly spicy full-flavored soup.

Once you puree it, the soup is thick and rich, totally luxurious even before you add a drop of cream. And the color is so vibrant, it looks like good health in a bowl. And that, after all, is the point.


This recipe requires some chopping. It's easiest if you do it all up front, and have everything ready to toss into the pot. So to start, chop up the onion, ginger, garlic, carrots and tomatoes.


Heat the olive oil and butter in the pot until the butter melts. Then toss in the onion and sauté until the onion is translucent, but not browned. 


Then add the ginger and garlic and stir for a few minutes until everything is fragrant and no longer smells "raw."


Add the carrots and tomatoes.


Then add the broth and bring it to a boil. Simmer, partially covered, until all of the veggies are tender.


Puree the soup. I did this with an immersion blender. But you could use a regular blender or food processor. If you want a little more texture, use a food mill.


The soup is delicious as is, but you can stir in some heavy cream to make it richer.


Carrot Ginger Soup

Adapted from a recipe in Bon Appetit

1 Tbsp butter
3 Tbsp olive oil
1 1/2 cups chopped onion
1 Tbsp finely chopped peeled fresh ginger
1 1/2 tsp minced garlic
1 1/4 lb medium carrots, peeled, chopped (about 3 cups)
2 tomatoes, seeded, chopped (about 1 1/3 cups)
4 cups chicken broth (or use vegetable broth to keep the soup vegetarian)
Heavy cream (optional)

1.    Melt butter and olive oil in heavy large pot over medium-high heat. Add onion; sauté 6 minutes. Add ginger and garlic; sauté 2 minutes.

2.    Add chopped carrots and tomatoes; sauté 1 minute. Add broth and bring to boil. Reduce heat, cover partially and simmer until carrots are very tender, about 30 minutes. Cool slightly.

3.    Puree soup in batches in a blender or with an immersion blender. If necessary, return soup to pot. Season with salt and pepper. (Can be made 1 day ahead. Cover and chill.)

4.    Bring soup to a simmer. Add heavy cream, if desired. Ladle into bowls. Enjoy!


Serves 4


March 22, 2012

Shrimp and Grits


Let me start with a disclaimer. I know nothing about grits. I grew up in New Jersey. My parents are from India. So grits are not a food I grew up eating.

So why am I writing about grits? A few weeks back, during a trip to New York City, I ate brunch at Mesa Grill, Bobby Flay's southwestern restaurant. I don't remember what I ordered. But I know it came with a side of grits.

I had expected bland. But they weren't. They tasted of corn. Nothing fancy. Just corn. Okay, and maybe some butter. The grits were so creamy. They had big, soft pieces of tender cornmeal. And kernels of whole corn.

I loved the grits. My sister loved the grits. My one-year old nephew loved the grits.

So I decided to make grits. Being from the North, when I think of grits, I think "shrimp and grits." So I found a recipe and went for it.

The shrimp part of the shrimp and grits was good. Spicy and tangy, redolent of smoked paprika. The perfect thing to pair with...

...grits. Yes, again it was the grits that stole the show. I'd bought a bag of stone ground grits and prepared them according to the directions on the package. They weren't as tender as the ones I had at Mesa Grill. And yet they were strangely addictive. In the way that mashed potatoes are addictive.

The grits have a mild, yet unmistakable taste of corn that's enhanced by a little butter and milk. Comfort in a bowl.


Start with your shrimp. Toss with paprika, oregano, thyme, salt and olive oil and set aside.


Cut bacon into bite size pieces. Cook it over medium-low heat until the fat renders out and the bacon is crispy. Remove the bacon, but leave the bacon fat in skillet.


Add the shrimp to the pan. Cook it until it's just cooked through, then remove it from the pan and set aside.


Cook the onion in the bacon fat for a few minutes until the onion is tender. Then add the garlic and let it sizzle for about 30 seconds.


Add the tomato paste to the skillet and leave it in one place for 30 seconds. This will allow it to caramelize and sweeten a bit in spots.


Then mix the tomato paste into the onions.


Add the diced tomatoes and water, mix, and let the mixture simmer, covered, over medium-low heat.


While the tomatoes are simmering, prepare the grits. In a saucepan, heat 3 cups of water. When the water comes to a boil, add the grits. Turn down the heat and cover.


Stir the grits with a whisk, frequently. The grits will need about 30 minutes to cook. They'll start out looking coarse and tough, but they'll become more and more tender as they cook.


Once they've cooked through, add the milk.


And watch them transform into a creamy pot of goodness.


Once the grits are done, add the shrimp back in to the skillet with the tomatoes. Stir in the hot sauce.


To serve, put a (generous) ladleful of grits into a shallow bowl. Top with shrimp and tomato mixture. Sprinkle with bacon.


Shrimp and Grits

Recipe from Taste for Adventure

1 lb shrimp, peeled and deveined
1 Tbsp smoked paprika
1 1/2 tsp dried oregano
1 ½ tsp dried thyme
½ tsp salt
2 tsp olive oil
2 slices bacon, cut into small chunks
1/2 white onion, sliced thinly
3 cloves garlic, minced
2 Tbsp tomato paste
1 (14.5 oz) can diced tomatoes, in their juices
1/4 cup water (for shrimp)
3 cups water (for grits)
1 cup quick-cooking grits
kosher salt and freshly ground pepper
½ to 1 cup whole milk
2 Tbsp butter
1 Tbsp hot sauce (your choice, I used Bella Forte hot sauce)

1.      Toss the shrimp with the paprika, dried herbs, ½ teaspoon salt, and olive oil. Set aside.

2.      Cook the bacon in a medium skillet over medium heat until crisp. Remove bacon from pan and set aside, leaving the bacon fat in the pan.

3.      To the pan add the shrimp. Sear on one side for 2 minutes. Flip and sear 30 more seconds to a minute. Remove from pan, set aside.

4.      Back in the pan, add the onions. Saute in the bacon fat until they start to soften, 4 minutes. Add the garlic and bloom 30 seconds.

5.      Add the tomato paste to the pan and caramelize in one spot for 30 seconds. Then toss with the onions and garlic to coat.

6.      Add the diced tomatoes and 1/4 cup water to the pan. Season with salt and pepper, cover and simmer on medium-low while you get the grits going.

7.      Bring 3 cups of water to a boil. Add the grits and turn down the heat. Cover until creamy, whisking often. When creamy, add the butter and milk.

8.      Add the hot sauce and shrimp to the tomatoes and stir to combine.

9.      To serve, ladle grits into a bowl. Top with shrimp, tomato sauce, and a sprinkle of bacon.


Serves 3


March 19, 2012

Chicken Chili with Corn and Swiss Chard


The word "chili" usually conjures up images of a bowl of red. It might be ground beef or ground beef and beans, like the Superbowl chili I wrote about last month. If you're in Texas, it means cubes of beef and no beans. Still, it's always red.

But it doesn't have to be. Take this chili, loaded with kernels of corn and leaves of Swiss chard. It definitely comes across as chili, with chili powder and ground cumin giving it an unmistakeable chili flavor.

But this is chili that's shed its bulky sweater for spring. It substitutes lean ground chicken (or turkey) in place of the ground beef. And it's loaded with beans and veggies.

To keep it light, eat it straight with a spoon. No toppings required except maybe a small hit of hot sauce. I promise it doesn't need much adornment.

Or you can top it with shredded cheese, minced onion or mashed avocado and scoop it up with tortilla chips. Either way, this chili is a winner.


Start with your spices. Combine salt, ground cumin, fennel seeds, dried oregano, and chili powder. Set aside.


Lightly brown onion and garlic in olive oil.


Add the ground chicken and spices.


Break up the meat with a wooden spoon as it cooks.


While the chicken is cooking, prepare the Swiss chard. Swiss chard is a leafy green with a mild flavor and a texture somewhere between spinach and kale. To prepare the chard, wash the leaves, then lay them flat, one at a time. You’ll see a large, tough stem in the middle. You need to cut off the leaf on either side of the stem, then discard the stem. Once you've done that, cut the leaves into bite-size pieces (they won’t shrink much when you cook them).


Once the chicken has cooked through, stir the flour into your pot and cook for a minute or so. The flour will help the chili thicken up as it cooks.


Add the beans (I used a combination of pinto and cannellini, but use whatever you like), the Swiss chard, corn, and chicken stock. Simmer for about an hour until the liquid reduces and thickens.


Finally, add the crushed red pepper flakes and taste for salt and pepper.


Enjoy!


Chicken Chili with Corn and Swiss Chard


2 Tbsp olive oil
1 large onion, chopped
garlic cloves, minced
2 lb ground chicken
1 tsp salt, plus more for seasoning
2 Tbsp ground cumin
1 Tbsp fennel seeds
1 Tbsp dried oregano
2 tsp chili powder
3 Tbsp flour
2 (15-ounce cans) cannellini or other white beans, rinsed and drained
1 bunch (about 1 pound) Swiss chard, stems removed, leaves chopped into 1-inch pieces
11/2 cups frozen corn, thawed
4 cups low-sodium chicken stock
1/4 tsp crushed red pepper flakes
Freshly ground black pepper for seasoning

1.    In a large heavy-bottomed saucepan or Dutch oven, heat the oil over medium-high heat. Add the onion and cook until translucent, about 5 minutes. Add the garlic and cook for 30 seconds.

2.    Add the ground chicken, 1 teaspoon salt, cumin, fennel seeds, oregano, and chili powder. Cook, stirring frequently, until the chicken is cooked through, about 8 minutes. Stir the flour into the chicken mixture.

3.    Add the beans, Swiss chard, corn, and chicken stock. Bring the mixture to a simmer, scraping up the brown bits that cling to the bottom of the pan with a wooden spoon. Simmer for 55-60 minutes until the liquid has reduced by about half and the chili has thickened.

4.    Add the red pepper flakes and simmer for another 10 minutes. Season with salt and pepper, to taste.


Serves 6


March 14, 2012

Chicken Tinga Tacos


The March, 2012 Daring Cooks’ Challenge was hosted by Carol, a/k/a Poisonive – and she challenged us all to learn the art of Braising! Carol focused on Michael Ruhlman’s technique and shared with us some of his expertise from his book “Ruhlman’s Twenty”.

Braising is a fairly foolproof technique. As explained by Poisonive, you typically sear your meat (or veggie) in hot fat to add flavor and aroma, and to enhance color (browning) and texture (crust). You then submerge your meat in liquid and cook it slowly and gently at a low heat.

What's nice about braising is that once you get your meat in the liquid, you barely have to pay any attention to it. What's more, the flavor of braised food generally improves with time. So it's a great make-ahead dish for guests.

For this challenge, I chose to make chicken tinga tacos. "Tinga" refers to a smoky Mexican tomato sauce. In this recipe, the smoky flavor came from canned chipotle peppers in adobe. This recipe was dead easy. And quite tasty.

The chicken was prepared in a traditional braise. I browned the chicken thighs in a bit of oil, then simmered them in a tomato/chipotle sauce until they were cooked through and tender. Once I shredded the chicken, I was ready to assemble my tacos.

I used corn tortillas as my base. I think they have more flavor than flour tortillas. 

Have fun with the toppings. The recipe I used suggested topping the tacos with Cotija cheese, scallions and cilantro. Instead, I used shredded cabbage for crunch, mashed avocado for richness, cubed mango for a hit of sweetness, and a drizzle of lime juice to brighten everything up. Delicious!


Season your chicken thighs with salt and pepper, then lightly brown them on both sides in some olive oil. Set aside.


Now prepare the sauce. In the same skillet you used for the chicken, add a bit more oil, then the onion. Brown the onion, then add some garlic.


Add the tomatoes, broth and chipotles. Simmer until everything thickens up.


Puree the sauce in a blender or food processor or with an immersion blender.


Place the chicken and sauce in an ovenproof saucepan. Make sure the chicken is covered by the sauce. 


Bake until the chicken is cooked and tender.


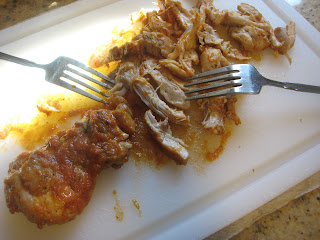
Remove the chicken from the sauce and shred it. 


Then return the shredded chicken to the sauce. (I also added a can of rinsed and drained pinto beans.)


Now assemble your tacos! Heat the corn tortillas. Create a bed of shredded cabbage or lettuce. Place some chicken on top. Then add the avocado and mango and a drizzle of lime juice. Enjoy!


Chicken Tinga Tacos

Recipe slightly adapted from Food and Wine magazine

Salt and freshly ground black pepper
1/4 cup plus 2 tablespoons extra-virgin olive oil
2 1/2 pounds trimmed, skinless, bone-in chicken thighs (I used skinless, boneless)
1 large onion, thinly sliced
3 large garlic cloves, minced
One 28-ounce can diced tomatoes
2 canned chipotles in adobo, coarsely chopped
1 cup chicken broth
24 corn tortillas
Toppings of your choice (suggestions: shredded or crumbled cheese, scallions, cilantro, avocado, lime juice, mango, shredded lettuce, shredded cabbage)


1.    Heat 3 tablespoons of the olive oil in a large nonstick skillet. Season the chicken all over with salt and pepper, add it to the skillet and cook over moderately high heat, turning once, until browned, about 8 minutes. Set the chicken aside and pour off the fat in the skillet.

2.    Add the remaining 3 tablespoons of olive oil to the skillet along with the onion. Cook over moderately high heat, stirring occasionally, until the onion is lightly browned and softened, 5 minutes. Add the garlic and cook until fragrant, 2 minutes.

3.    Add the tomatoes and their juices, the chipotles and the broth and bring to a boil. Simmer over moderate heat, stirring occasionally, until thickened and slightly reduced, 20 minutes.

4.    Preheat the oven to 350°. Puree the sauce until smooth and season with salt and pepper. Place the chicken and sauce in an oven proof saucepan. Make sure the chicken is covered by the sauce.

5.    Bake the chicken uncovered in the center of the oven for about 45 minutes, until the meat is tender and the sauce is very thick and darkened around the edges.

6.    Wrap the tortillas in foil and warm them in the oven for about 10 minutes.

7.    Remove the chicken from the sauce and shred the meat; discard the bones. Return the chicken meat to the sauce.

8.    Spoon about 3 tablespoons of chicken onto each tortilla and sprinkle with the toppings of your choice.


Makes 24 tacos.