October 31, 2011

Chocolate Pots de Crème


Last night I caught my son methodically transferring the Halloween candy I'd bought for trick-or-treaters into his own trick-or-treat bag. He was working so quietly and diligently that I had to smile. And I couldn't really blame him. Who can look at all those bags of chocolate without wanting some for themselves?

But the truth is that Halloween candy is usually a disappointment. Milk chocolate, the stuff of most kid-friendly candy bars, doesn't really satisfy a deep chocolate craving. 

So leave the Halloween stash to your kids. And make yourself a more grownup treat. 

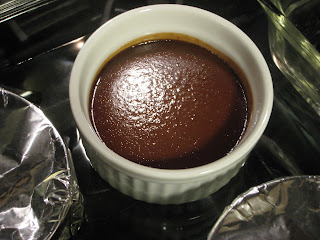
These chocolate pots de crème are chocolate nirvana. The chocolate is rich, intense, and dark. If you’re happy nibbling a Hershey bar, this dessert may not be for you. But if you’re serious about the percentage of cocoa in your chocolate, take a closer look.

These custards are definitely a splurge, rich with cream and eggs. But they're worth it.

Be sure to use good quality chocolate when you make these. Cooking with chocolate is like cooking with wine: for this dessert, choose a chocolate you’d happily eat on its own. I used Valrhona bittersweet chocolate, 71% cocoa.

And remember -- the best way to deal with your kid's sugar high is to be on one of your own!  ;-)

Happy Halloween!


Chocolate is always a good place to start. Place yours on a cutting board and chop it up. A serrated or Santoku knife works well for this task.


Whisk together your eggs yolks and sugar in a large bowl.


Bring the milk and cream to a simmer in a saucepan. As soon as it reaches a simmer, turn off the heat.


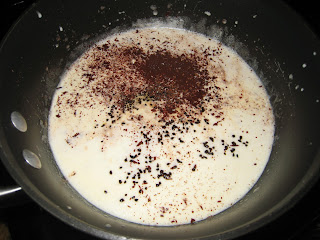
Add the chocolate, instant coffee and vanilla extract. (The coffee and vanilla weren't in the original recipe but adding a little of both gives the chocolate a more complex flavor.) 


Whisk until the chocolate is completely melted.


Slowly add the chocolate mixture to the egg/sugar mixture. Add just a little of the chocolate mixture at first. If you add too much of the hot chocolate mixture to the eggs right away, you'll end up with scrambled eggs.


Continue until you've combined all of the chocolate into the eggs.


Pour the mixture through a strainer, into another bowl or large measuring cup.


Set up your ramekins in a large baking pan. Equally divide the custard mixture into the ramekins. Then cover each ramekin with aluminum foil.


Place the baking pan in the oven. Then pour enough hot water into the baking pan to come halfway up the sides of the ramekins.


Bake until the custards are mostly set but still jiggle a bit in the middle.


Cool the custards on a cooling rack. Then transfer them to the fridge and chill until cold.


Top with whipped cream and serve!


Chocolate Pots de Crème

Recipe from Bon Appetit

2 cups whipping cream
1/2 cup whole milk
5 ounces bittersweet (not unsweetened) or semisweet chocolate, chopped (I used Valrhona 71%)
1 tsp vanilla extract
1/2 tsp instant coffee powder
5 large egg yolks
1/3 cup sugar

1.      Preheat oven to 325°F.

2.      Bring cream and milk just to simmer in heavy medium saucepan over medium heat. Remove from heat. Add chocolate, vanilla extract, and coffee powder; whisk until melted and smooth.

3.      Whisk yolks and sugar in large bowl to blend. Gradually whisk in hot chocolate mixture. Strain mixture into another bowl. Cool 10 minutes, skimming any foam from surface.

4.      Divide custard mixture among eight 3/4-cup custard cups or soufflé dishes. Cover each with foil. Place cups in large baking pan. Add enough hot water to pan to come halfway up sides of cups.

5.      Bake until custards are set but centers still move slightly when gently shaken, about 55 minutes. Remove from water. Remove foil. Chill custards until cold, about 3 hours or overnight.

6.      Top with whipped cream and serve.


Note: You can make these custards 2 days ahead. Cover and keep chilled.


Makes 8 servings

October 25, 2011

Potato, Leek and Fennel Soup


I have a hard time dressing properly for this weather. The days of shorts and t-shirts are long gone. But it's not yet time for my warm and cozy sweaters and cords either. Somehow I never seem to have the right clothes for these days that are nippy but not cold, temperate but not warm.

But where my closet fails me, my cupboard never does. This time of year I love to eat soups. No longer the light, chilled soups of summer. But not yet the creamy chowders or rich stews of winter. No, right now I want something warm and comforting, but not too heavy.

The most basic of soups that I love in the early fall is this potato, leek and fennel soup. For this dish, you simply sauté then boil the ingredients together with some broth and then puree. The pureed potatoes give this soup its hearty consistency, without making it too heavy or filling. There isn't a drop of cream or dairy in this soup, but it still feels luxurious.

This is really more of a template than a recipe. If you want more depth, roast the potatoes and fennel first, tossed in a bit of olive oil, salt and pepper. If you have leftover roasted potatoes, use them instead. Roasted butternut squash sitting in Tupperware? Steamed cauliflower? Sautéed zucchini? Any of those, or pretty much any other vegetable you have in your fridge would make a nice addition to this soup.


Chop up your fennel and leeks. Make sure to thoroughly wash your leeks between each layer. The only thing that could ruin this soup is gritty leeks.


Chop up your potatoes.


Saute the fennel and leeks in a bit of butter and olive oil until they're nice and translucent.


Toss the potatoes into the saucepan with the fennel and leeks.


Add the broth. You can use vegetable broth to keep the soup vegetarian. Otherwise chicken broth is fine.


Simmer for about half an hour until the potatoes are tender.


Then puree the soup. An immersion blender is a great tool for the job. But you could also puree the soup in a blender or food processor or put it through a food mill.


Before serving you'll want to taste the soup for seasoning. You'll be surprised at how much salt this soup takes. It's good with plenty of pepper too.


Potato, Leek and Fennel Soup

Recipe from Bon Appétit

2 Tbsp (1/4 stick) butter
2 cups sliced leeks (white and pale green parts only)
2 cups sliced fennel bulb, fronds reserved for garnish
4 14 1/2-ounce cans low-salt chicken broth (use vegetable broth to keep the soup vegetarian)
2 pounds red-skinned potatoes, peeled, cut into 1/2-inch pieces (about 4 cups)

1.      Melt butter in heavy large pot over medium-high heat. Add leeks and fennel and sauté until leeks are translucent, about 7 minutes. Add broth and potatoes and bring to boil.

2.      Reduce heat to medium-low. Simmer soup until potatoes are very tender, about 25 minutes. Working in batches, purée soup in blender. Return to same pot. Rewarm soup if necessary.

3.      Season with salt and pepper. Ladle soup into bowls; garnish with reserved fennel fronds and serve.

Serves 8

October 21, 2011

Tomatillo Albondigas Soup


Remember that SNL skit with Jimmy Smits playing a Latino newscaster? He'd be reading his newscast in perfect, unaccented English and then his American colleagues would break into exaggerated Spanish to say Neek-o-ra-gwa or an-chee-lah-dahs?!

That's how I feel saying tomatillos. It's impossible for me to pronounce without going all Sofia Vergara.

Anyway. Have you ever cooked with tomatillos? This was my first time.

Tomatillos are fruits. When you buy them, they're covered in a papery husk that you have to remove before cooking. 


The fruit is smooth on the outside, the color of a Granny Smith apple. Inside, the tomatillo is white and has a sort of spongy texture.

Tomatillos are notoriously sour. Still, when I cut the tomatillo I was surprised by the sharp, tangy smell. It wasn't unpleasant, but it did make my nose itch. Don't worry -- the flavor mellows out a lot when you cook it. Tomatillos are also a little sticky when you cut them, which I also didn't expect.

Once I got past those first impressions, I was pleasantly surprised. Tomatillos become smooth and mellow when you cook them, but they do hold on to some of their tartness. You'll find their flavor familiar if you've eaten Mexican dishes with a "verde," or green, sauce.

In this recipe, the tomatillos become the base for a soup that's made of nothing more than the tomatillos, garlic, onion, chilies, broth and a couple of spices.

The "albondigas" in this soup are meatballs. The recipe called for a mixture of beef and pork but I made the meatballs with ground turkey to keep things a little healthier and lighter. The meatballs contain cooked rice, which I've never seen before. The rice is used as a binder, the way bread or breadcrumbs are used in other meatball recipes.

The mellow meatballs and tangy, slightly spicy soup nicely completely one another. It's a bueno dish, this Toh-mah-tee-yo Al-bon-dee-gas soup!   


Peel the husks off the tomatillos and cut them in half.


Chop the onion, garlic and jalapenos.


Combine everything in a stockpot along with the chicken broth, salt, pepper, and cumin.


Simmer until the tomatillos are tender.


Puree the soup until it's smooth. I used an immersion blender but you could also do this in a blender or food processor.


I had some baby spinach in the fridge so I added it to the soup when I was reheating it.


For the meatballs, combine the meat, onion, rice, egg, salt, pepper, cumin and ground cloves. I didn't have ground cloves so I used a bit of allspice.


Mix the ingredients gently but thoroughly.


Form the meat mixture into 1-inch meatballs.


To cook the meatballs, drop them gently into the soup and let them simmer for about 30 minutes.


Once the meatballs are cooked, taste the soup for salt and pepper.


To serve, squeeze some lime juice over the soup (yes, the soup can take this extra bit of tang) and sprinkle with chopped cilantro.


Tomatillo Albondigas Soup

Recipe adapted from Cook & Be Merry


Soup
1 pounds fresh tomatillos, husks removed and washed, cut in half
1 small onion, peeled and coarsely chopped
4 large garlic cloves, peeled, cut in half
1 small jalapeno peppers, split and seeded
1/4 tsp ground cumin
1 1/2 tsp kosher salt
1/8 teaspoon ground black pepper
3 cups chicken stock
7 sprigs fresh cilantro (I didn't have cilantro so I threw in some baby spinach to give it that green color)

Meatballs (Albondigas)
1/2 pound ground beef chuck (I used 1 pound ground turkey in place of the beef/pork mixture)
1/2 pound ground pork
1 small onion, peeled, finely chopped
1/4 cup cooked white rice
1 large egg
1 tsp kosher salt
1/8 tsp ground cumin
1/8 tsp ground cloves

Garnish
Juice of 2 limes (1/4 cup)
Leaves from 5 sprigs fresh cilantro, coarsely chopped


Soup
1.      In a large stockpot or dutch oven, over medium-high heat, combine the tomatillos, onion, garlic, jalapeno peppers, cumin, salt, pepper and the chicken stock, and bring to a boil.
2.      Reduce the heat and simmer, skimming off any foam that rises to the top, until the tomatillos are tender, about 10 to 15 minutes. Add cilantro sprigs.
3.      Using an immersion blend, puree the soup until smooth. (You can also do this in a blender or food processor).
4.      If the soup is too thick, add some broth or water, and bring soup to a simmer.

Meatballs
1.      While the soup broth is simmering, in a large mixing bowl, combine the ground meat with the minced onion, cooked rice, the raw egg, 1 teaspoons kosher salt, ground cumin and ground cloves, and mix gently but thoroughly.
2.      Form the meat into 1-inch meatballs. Keep your hands lightly moistened with cold water to prevent the ground meat from sticking. The mixture should yield about 20 meatballs.
3.      Place meatballs in the soup and simmer, about 30 minutes, until the meatballs are cooked. Skim off any foam that rises to the top.
4.      Add ½ cup or more water to replace what has evaporated and to adjust the salt level.

To Serve
1.      Place 4 meatballs in a large soup bowl. Ladle about one cup of soup over the meatballs, and squeeze lime juice into each bowl.
2.      Sprinkle with chopped cilantro and serve immediately.


Serves 5


October 18, 2011

Mini Oreo Cheesecakes


My husband was out of town last weekend. So I invited a bunch of friends over for a girls’ night at my house. It was great – no men, no kids. Just a bunch of moms in desperate need of a night out.

There are really only two rules for entertaining a group of women, especially a group of moms who’ve just come from wrangling their kids into bed.

The first is wine. And plenty of it.

The second is bite-sized food. This is a good idea for lots of reasons. You can keep holding that wine glass in one hand while you pop a bite of food in your mouth with the other. If everything’s just a bite or two, you can taste a lot of different things. It keeps the vibe more casual than a sit-down meal. And so on and so forth.

But what it really comes down to is this: Women like to eat. But we don’t like to be obvious about it.

Serving mini foods solves that problem. Yes, we (I?) might very well eat 4 2-bite brownies. But you won’t see me standing there with a giant piece of brownie in my hand. So for all you know, that bite of brownie in my mouth is the first one I’ve eaten all night.

Same goes for these mini Oreo cheesecakes. They’re the full cheesecake experience – Oreo cookie crust, creamy, Oreo-flecked filling, crunchy crushed-Oreo topping -- but packaged into a tiny treat the size of a cupcake. You can eat the entire thing and not feel guilty.

And if you have another, I’ll pretend not to notice.


Start with a package of Oreo cookies. Leave 15 cookies whole. Chop 6 cookies into smaller pieces.


Put cupcake liners in a muffin pan and then put an Oreo cookie in each liner (the cookie becomes the crust for these cheesecakes).


Beat the cream cheese. Then add the sugar, vanilla and eggs.


Beat in the sour cream and salt.


Then stir in the chopped cookies.


Fill the liners with the batter. You can fill them up to the top; this batter doesn’t expand much.


Bake until the batter is just set. Cool completely. Then refrigerate at least 4 hours before serving.


To serve, top the cheesecakes with some whipped cream and/or crushed Oreo cookies.


Mini Oreo Cheesecakes

From Martha Stewart’s Cupcakes

21 Oreo cookies (15 whole, 6 chopped)
2 8-ounce packages cream cheese
½ cup sugar
½ tsp vanilla extract
2 large eggs, room temperature
½ cup sour cream
Pinch of salt

1.      Preheat oven to 275 degrees. Line muffin tins with paper cupcake liners, and then place one whole cookie in the bottom of each lined cup.

2.      On medium-high speed, beat cream cheese until smooth, scraping down sides of bowl as needed. Gradually add sugar, and beat until combined. Beat in vanilla.

3.      Drizzle in eggs, a bit at a time, beating to combine and scraping down sides of bowl as needed. Beat in sour cream and salt. Stir in chopped cookies by hand.

4.      Divide batter evenly among cookie-filled cups, filling each almost to the top. Bake, rotating tins halfway through, until filling is set, about 22 minutes.

5.      Transfer tins to wire racks to cool completely. Refrigerate (in tins) at least 4 hours (or up to overnight). Remove from tins just before serving.


Makes 15 mini cheesecakes

October 14, 2011

Moo Shu Chicken with Thin Pancakes and Hoisin Sauce


The October Daring Cooks' Challenge was hosted by Shelley of C Mom Cook and her sister Ruth of The Crafts of Mommyhood. They challenged us to bring a taste of the East into our home kitchens by making our own Moo Shu, including thin pancakes, stir fry and sauce. 

I have to be honest. If it wasn’t for this Daring Cook’s Challenge, I don’t think I would have ever attempted to make Moo Shu at home. We occasionally order Moo Shu from our local Chinese restaurant. I like it fine. But it’s not something I start to miss after a few weeks of not having it.

If you’ve never had it, Moo Shu is a Chinese stir fry dish. You make it with shredded vegetables, meat, and scrambled egg. You roll this filling into thin pancakes and eat it with a sauce.

You can change up the stir fry as you like. But some vegetables are traditional. Moo Shu traditionally contains cabbage, scallions, bamboo shoots, and dried black mushrooms. I’m not a fan of dried black mushrooms so I used white button mushrooms. I also had a zucchini in the fridge so I sliced it up into the thin strips and threw that in there too.

The Moo Shu I’ve had has always been served with plum sauce. Apparently, though, hoisin sauce is more traditional. I made the recipe provided in the challenge and it was good, but didn’t taste anything like the hoisin sauce in my fridge (which may be a reflection of the hoisin sauce in my fridge). The homemade hoisin ended up being a lot less sweet than bottled hoisin, and a really nice complement to the Moo Shu.

The final (and most fun and challenging) part of the challenge was making the thin pancakes that you serve with Moo Shu. The ingredients for these pancakes are super basic – flour, water, vegetable oil and sesame oil. It’s the method that’s so interesting. (More details below!)

All in all I have to say that I really enjoyed participating in this challenge…and eating the results!


The sauce is so simple. Just gather your ingredients.


Then whisk them together until they’re combined.


Next, gather your veggies. I used Napa cabbage, button mushrooms, bamboo shoots, scallions, and zucchini.


Thinly slice the veggies and set them aside.


Thinly slice your chicken, and set that aside as well.


When you're ready to make the Moo Shu, scramble your eggs until they are just barely set. Put them aside.


Now add your chicken to the oil in a very hot wok or pan and saute for a minute until it turns white.


Add the rest of your veggies to the pot.


And then add the salt, soy sauce and rice wine.


The directions said to cook this mixture for another 2 minutes, but I cooked it for several minutes longer to evaporate some of the liquid at the bottom of the pot.


Add the sesame oil and scrambled eggs to your chicken and veggie mixture, breaking up the eggs to distribute them throughout the stir fry.


Finally, the thin pancakes. Make these last so you can serve them fresh and warm. Sift the flour into a mixing bowl. (I was so excited to use my new digital scale!)


Add water to the flour then knead it into a soft dough. Cover with a damp paper towel and set aside for 30 minutes. (This would be a good time to make the hoisin sauce or stir fry if you haven't already.)


Now the fun part. Knead the dough again for a few minutes until it's smooth.


Divide it into 2 or 3 equal parts, then further divide one of those parts into 6 small pieces.


Take 2 of those pieces. In your hands, roll each piece into a ball. Then with your palms, flatten each ball into a pancake.


Now, using a rolling pin, roll each pancake thinner so that they are about 3 inches in diameter.


Brush the top of each pancake with a little sesame oil.


Then put one pancake, oiled-side down, on the other pancake.


Roll the doubled pancake out into a 6- to 8-inch circle.


Repeat this process for the remaining dough.


Heat a frying pan over high heat. When you're ready to start making the pancakes, reduce the heat to low. Put one double pancake on the pan.


When the underside is covered with light brown spots, flip the pancake over and cook the second side.


When the second side is cooked, remove it to a plate. Now, carefully separate the two pancakes. They should come apart pretty easily. Be careful -- a lot of steam will escape when you separate the pancakes. Cover the cooked pancakes with a damp paper cloth while you cook the remaining pancakes.


To assemble the Moo Shu, put a few tablespoons of stir fry in the center of a pancake.


Fold up the bottom and then fold in the sides, like a burrito.


Drizzle a little hoisin sauce on top and dive in!


Moo Shu Chicken with Thin Pancakes and Hoisin Sauce


Hoisin sauce

4 Tbsp soy sauce
2 Tbsp peanut butter OR black bean paste
1 Tbsp honey OR molasses
2 tsp white vinegar
1/8 tsp garlic powder
2 tsp sesame seed oil
¼ tsp Chinese style hot sauce (optional, depending on how hot you want your hoisin
sauce)
1/8 tsp black pepper

1.      Mix all of the ingredients together by hand using a whisk.


Moo Shu Chicken

2/3 cup Dried black fungus (I used white button mushrooms)
½ lb chicken breast (the original recipe called for pork loin)
¾ cup bamboo shoots, thinly cut
3 cups Napa cabbage, thinly cut
3 large eggs
1 tsp salt
4 Tbsp vegetable oil
2 scallions
1 Tbsp light soy sauce
2 tsp rice wine
A few drops sesame oil
12 thin pancakes to serve (see recipe, below)

1.      Soak the fungus in warm water for 10-15 minutes, rinse and drain. Discard any hard stalks, then thinly shred. (If using regular button mushrooms, just cut into thin slices without soaking first.)

2.      Thinly cut the chicken, bamboo shoots and Napa cabbage into matchstick-sized shreds. Thinly slice the scallions.

3.      Lightly beat the eggs with a pinch of salt.

4.      Heat about 1 tablespoon oil in a preheated wok and scramble the eggs until set, but not too hard. Remove and keep to one side.

5.      Heat the remaining oil. Stir-fry the shredded chicken for about 1 minute or until the color changes. Add the fungus (or mushrooms), bamboo shoots, Napa cabbage and scallions. Stir-fry for about 2-3 minutes, then add the remaining salt, soy sauce and rice wine. Blend well and continue stirring for another 2 minutes (or until most of the liquid evaporates).

6.      Add the scrambled eggs, stirring to break them into small bits. Add the sesame oil and blend well.

Serves 4


Thin Pancakes

2 cups (9 4/5 oz) all-purpose flour
About 3/4 cup boiling water
1/2 tsp vegetable oil
Dry flour for dusting
about 2 Tbsp sesame oil

1.      Sift the flour into a mixing bowl. Gently pour in the water, stirring as you pour, then stir in the oil.  Knead the mixture into a soft but firm dough.  If your dough is dry,  add more water, one tablespoon at a time, to reach the right consistency.  Cover with a damp towel and let stand for about 30 minutes.

2.      Lightly dust the surface of a worktop with dry flour.  Knead the dough for 6-8 minutes or until smooth, then divide into 2 equal portions. Roll out each portion into a long sausage and cut each sausage into 6-8 pieces.  Keep the dough that you are not actively working with covered with a lightly damp dish cloth to keep it from drying out.

3.      Roll each piece into a ball, then, using the palm of your hand, press each piece into a flat  pancake.

4.      Using a pastry brush, brush sesame oil onto the top of all of the pancakes. Top each pancake with another, so that the sesame-oil covered sides are touching. Each pancake should be a double pancake.

5.      Further roll each doubled pancake into a 6 to 8 inch circle.

6.      Place an ungreased frying pan over high heat. Once the pan is hot, lower the heat to low and place the pancakes, one at a time, in the pan. When little light-brown spots appear on  the underside, flip the pancake until the other side is cooked.

7.      Remove to a plate, and separate the two pancakes. Be careful separating the pancakes because steam will escape.

8.  Cover pancakes with a damp cloth until ready to serve.

Makes 12-15 pancakes


To Assemble


1.      Put a spoonful of the stir fry in the center of a pancake. Drizzle a little Hoisin sauce on top. Fold up the bottom of the pancake, then fold in the sides.

2.      Eat immediately!