October 28, 2012

Chickpea Salad


It's Sunday night and Hurricane Sandy is on her way. We've located the flashlights and bought the batteries. We've done the laundry in case we lose power. And we've stocked up on water and canned food.

I'm hoping this Frankenstorm won't live up to the hype. But just in case it does, here's a no-cook recipe you can make with some of the canned beans you've now got in your cabinet. (Of course if you're eating canned food that you can't cook then most likely your power is out. Which means you can't hop on your computer to look at this recipe.) Okay, I'm going to ignore this obvious break in logic and move on.

This recipe isn't just one to make in desperate times. I actually made it a lot this summer. It was a great lunch, filling and satisfying, but not heavy. It's very adaptable. Use whatever kind of beans you have. If you don't have shallots, add red onion, yellow onion or no onion at all. Use regular tomato in place of the grape tomatoes. Substitute lime juice and olive oil for the vinaigrette. You get the idea.

Remember, a hurricane is no excuse for a bad meal!

Stay safe everyone!


Start with canned chickpeas, drained and rinsed.


Add finely chopped shallot...


...halved grape tomatoes...


...and julienned basil.


Prepare the vinaigrette. It's just balsamic vinegar, olive oil, a touch of honey and salt and pepper.


Whisk it until it's well combined.


Toss the vinaigrette with the chickpea mixture. Let it sit for a bit to let the flavors meld.


Dig in.


Chickpea Salad

1 can chickpeas, rinsed and drained
1 cup grape tomatoes, halved
1 to 2 shallots, finely chopped
1 Tbsp julienned basil
1 Tbsp balsamic vinegar
1 tsp honey
salt, to taste
black pepper, to taste
1/4 cup extra virgin olive oil


1.    In a large bowl, combine the chickpeas, grape tomatoes, shallots and basil.

2.    In another bowl, whisk together the balsamic vinegar, honey, salt and pepper. Slowly add the olive oil and whisk together until well combined. (You can adjust the proportion of balsamic vinegar to olive oil to suit your taste.)

3.    Toss the vinaigrette with the chickpea mixture.

4.    Let sit for an hour before serving to let the flavors meld.


Serves 1


October 22, 2012

French Onion Soup


Years ago, my husband and I used to go to the symphony. This was before one of us (I won't say who) turned 40, disqualifying us from the Boston Symphony's young subscribers program. It was also before we had to think about finding a babysitter for a night out.

Rather than rushing through dinner to make the show, we often had a late dinner after the concert. One of our favorite places, Brasserie Jo, was a short walk from Symphony Hall. Since it was after 10 o'clock by the time we walked in, we'd generally skip the steak frites and roast chicken. Instead, especially in the dead of winter, we'd order the French onion soup. Or, as they called it, making it sound so much fancier, the onion soupe gratinée.

It was perfection. The soup was rich and flavorful, full of sweet, silky onions. It was topped with a slice of crisp baguette. But the best part, the part that I still think about years later, was the luscious cheese, melted and bubbling, all over the top. You'd dip your spoon in and pull it up, up, up, higher and higher until you had to go in for a bite, twirling it around your tongue like a strand of spaghetti.

I wasn't sure you could replicate that experience at home. But given how many years it's been since our last trip to Brasserie Jo (or the symphony for that matter), I figured I had to give it a try. And you know what? It worked.

Now I'd love an evening at the symphony, followed by a cozy meal at a brasserie. But when that's not in the cards, at least I can have the soup.


Cut the onions into thin slices.


Put the onions in a Dutch oven with thyme and salt.


Cook for 30 to 45 minutes until the onions are dark and sticky. Take your time. This is where all the flavor comes from.


Stir in the vinegar.


Add the chicken and beef broths. Bring to a boil and let it simmer.


While the soup is cooking, bake the bread until it hardens. This will help it stay crisp in the soup.


Shred your cheese.


When you're ready to eat, ladle some soup into oven-safe bowls. Top with one or two baguette slices and some cheese (be generous)!


Bake until the cheese melts. Then turn on the broiler for a minute or two until the cheese bubbles and browns in spots.


Enjoy!


French Onion Soup

Recipe slightly adapted from The America's Test Kitchen Family Cookbook


2 Tbsp unsalted butter
5 medium (3 lbs) red onions, halved and sliced thin
2 tsp minced fresh thyme
1/4 cup balsamic vinegar
6 cups low-sodium chicken broth
1 3/4 cups low-sodium beef broth
2 bay leaves
black pepper
1 baguette, sliced 1/2-inch thick
8 ounces Gruyere cheese, shredded (you can also use mozzarella or any cheese that melts well)

1.    Preheat the oven to 350 degrees and adjust the oven rack to the middle position.

2.    Melt the butter in a large Dutch oven over medium heat. Add the onions, thyme, and 1/2 teaspoon salt. Cook, stirring occasionally, until the onions are dark and sticky, about 30 minutes (it took me closer to 45 minutes).

3.    Stir in the vinegar and scrape the browned crust from the pot.

4.    Stir in the chicken broth, beef broth, and bay leaves. Bring to a simmer and cook fro 20 minutes. Season with salt and pepper to taste and discard the bay leaves.

5.    While the soup is simmering, prepare the bread. Lay the slices on a baking sheet. Bake for about 10 minutes, turning once, until the bread has hardened. This will help it stay crisp when you put it on the soup.

6.    When the bread is out of the oven, increase the heat to 450 degrees.

7.    Arrange oven-safe soup bowls on a rimmed baking sheet and ladle the soup into them. Top each bowl with 2 baguette slices. Sprinkle each with 1/4 cup of the cheese.

8.    Bake for 5 minutes. Then turn on the broiler and heat for 1 to 2 minutes, until the cheese begins to bubble and brown in spots. Watch carefully so that the cheese doesn't burn. Serve hot.


Serves 8

October 14, 2012

Feijoada


Rachel Dana was our October 2012 Daring Cooks' Challenge hostess! Rachel brought Brazil into our lives by challenging us to make Feijoada and Farofa along with some other yummy side dishes traditionally served with Feijoada, which is a delicious black bean and pork stew.

Feijoada [fay-JWA-da], a rich stew of black beans and pork, is Brazil’s national dish. Traditional feijoada contains a combination of many varieties of pork. Pork shoulder, pork loin, smoked pork sausage, salted pork ribs, fresh ham, bacon, ham hock, dried pork, pork knuckles. You name it, you can use it. 

I kept my meats pretty standard – bacon, pork shoulder and andouille sausage (linguica would have been more authentic). Otherwise, I was pretty true to the recipe. I was a little concerned that it would be bland, but I was wrong. The combination of leeks, shallots and scallions plus the paprika, Tabasco and Worcestershire gave it a solid, but not overpowering flavor.

I served the feijoada over rice and with the traditional accompaniments of quickly sautéed collard greens and orange slices, a really refreshing side that cut right through the richness of the stew.


Start with the beans. 


Cover with cold water and bring to a boil. Cook, covered, for about an hour, until the beans are just cooked through.


In the meantime, sauté the pork shoulder, sausage, and whichever other meats you’re using, in batches, until browned on all sides but not cooked through. Set aside and cover.


In a Dutch oven, sauté the bacon until it’s lightly crisp. Add the onion, celery, leeks, shallots and scallions. Cook until tender. This base is going to give the feijoada lots of flavor.


Add the garlic. Then add the beans, plus all of their cooking liquid to the bacon and vegetables and bring to a boil. Add the meats plus accumulated juices to the beans. 


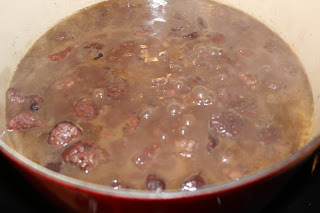
Simmer, covered, for three hours until the meats are tender. (Look at how thick and rich it is after all that simmering!)


Season liberally with salt, pepper, nutmeg, paprika, Tabasco and Worcestershire.


Serve on rice, along with garlicky sautéed collard greens and orange slices.


Feijoada

Adapted from a recipe by Leticia Moreinos Schwartz

4 cups dried black beans, picked and rinsed
4 quarts water
1 teaspoon salt
1/2 lb bacon, cut into pieces
2 lb pork shoulder, cut into 1-inch pieces
1 ½ to 2 lb chorizo, linguica or andouille sausage
1/2 cup onions, chopped
1/2 cup celery, chopped
1/2 cup leeks, chopped
1/2 cup shallots, chopped
1/2 cup scallions, chopped
2 Tbsp chopped garlic, minced
3 bay leaves
Kosher Salt
Freshly ground pepper
Pinch of ground nutmeg
Paprika
Cayenne pepper
Tabasco sauce
Worchestershire sauce

1.    Place the beans in a very large pot and cover with cold water. Bring to a boil over high heat. Turn heat to medium, and cook, covered, for 1 hour, until the beans are just cooked but not too mushy (I had to cook mine a bit longer). Set aside.

2.    Meanwhile, start preparing meats and vegetables. Saute the pork shoulder and sausage, in batches, until browned on all sides. Transfer to a large bowl and cover tightly with aluminum foil.

3.    Heat the oil in an extra-large Dutch oven pan, and cook the bacon until lightly crispy.

4.    Add the onions, celery, leeks, shallots and scallions and cook, stirring occasionally, until tender, about 3 to 5 minutes.

5.    Add the garlic and stir to blend with other vegetables. Add the beans and bring to a boil.

6.    Add the meats and any accumulated juices from the bowl. Cover the pan and simmer at low heat for about 3 hours, until the meats are tender and falling off the bones.

7.    Season with salt, pepper, nutmeg, paprika, Tabasco and Worcestershire, all to taste.

8.    Serve with rice, farofa, collard greens (quickly sautéed over high heat with plenty of garlic), and orange or grapefruit slices.


 Serves 8 - 10 


October 7, 2012

Apple Cinnamon Pancakes


This really isn't even a recipe. More of an idea. Just in case you're looking for something else to do with all those apples you enthusiastically brought home after a fun day of apple picking. And put into pies. And crisps. And turnovers. And fritters. And cakes. And then you looked in the fruit bowl and it was still full of apples because, really, out on the orchard, it didn't seem like all that many...

One of my favorite ways to use apples is in pancakes. I'm not a huge fan of topping my pancakes with fruit. But I do love putting fruit into the batter. 

For these pancakes, I grate the apples before adding them to the batter. That way, they dissolve into the pancakes as they cook, lending the pancakes their flavor, without spoiling the texture. I add some cinnamon too. Just enough to let me know it's in there.


Start by making your favorite pancake batter. Full disclosure: I used Bisquick. 


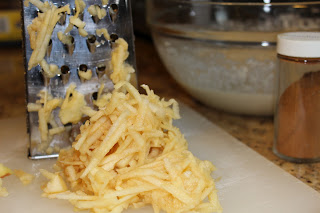
Grate a couple of apples.


Add the grated apple to the batter, along with cinnamon. Stir until combined.


Heat the skillet over medium-low heat. When it's hot, add some oil, then 1/2 cup of batter.


Cover the skillet with a lid.


Remove the lid when the edges of the pancake start to dry up and the top of the pancake is covered with air bubbles.


Flip the pancake. While the second side is cooking, add a tiny pat of butter to the top and let it melt all over.


Drizzle with maple syrup and enjoy!


Apple Cinnamon Pancakes

Recipe by The Garlic Press

2 cups Bisquick
1 cup milk (I add a little extra)
2 eggs
1 to 2 apples, peeled (depends on the size of your apples and how much apple flavor you want)
1/8 to 1/4 tsp cinnamon (again, adjust to taste)
canola oil
butter
maple syrup, for serving

1.    Mix together Bisquick, milk and eggs until just combined.

2.    Grate apples. Add grated apple and cinnamon to pancake batter. Mix until combined.

3.    Heat skillet over medium-low heat. When hot, add oil to the pan. Put 1/2 cup batter in the center of the skillet. Spread it out to an even thickness. Cover skillet with a lid.

4.    When the edges of the pancakes have started to dry up and the top of the pancake is covered with air bubbles, flip the pancake.

5.    Cook until the bottom of the pancake is golden brown. While the second side cooks, melt a small pat of butter on the top of the pancake.

6.    Drizzle with maple syrup and serve.


Makes 6 pancakes.